DIY Jute Chair Seat: Give an Old Chair New Purpose
If you've got an onetime chair with a gross seat, or 1 with no seat at all, but you all the same love the chair – don't worry! All is not lost. With about an hour of your fourth dimension and a few simple materials, you can breathe new life into the chair and go far both functional and beautiful once again.
 View in gallery
  View in gallery
 This tutorial volition allow y'all to completely customize your chair seat with woven jute webbing, which comes in a multifariousness of widths and even color options, including the spacing of the webbing itself and boom trim options. Jute webbing is incredibly potent and durable, used for many upholstery projects. A jute-seat chair will work well with rustic, cottage, industrial, and fifty-fifty modern home décor styles. Let's get started.
DIY Level: Beginner to Intermediate
 View in gallery
 Materials Needed:
- Wooden chair
- Jute webbing (Note: Amount needed volition vary depending on the size of your chair and the width and spacing of your webbing.
- Instance shows two chairs done with two" jute webbing, 10 yds used.)
- Staple gun & staples (electric recommended)
- Blast head trim & rubber mallet (optional)
 View in gallery
  View in gallery
 Get-go, you'll want to ready your chair. If your chair of choice already has no seat, motility on to Step two. If your chair has a seat that you'll be replacing with this project, remove the old seat at present.
 View in gallery
  View in gallery
 Measure your chair seat to determine where your webbing will get. Because I am keeping the spacing of webbing very tight in this commencement example, my chair's measurements allowed me to start in the middle of the chair back.
 View in gallery
 Fold the edge of the webbing under one/2″, and then identify iii staples to concur it in identify on the back of the chair.
 View in gallery
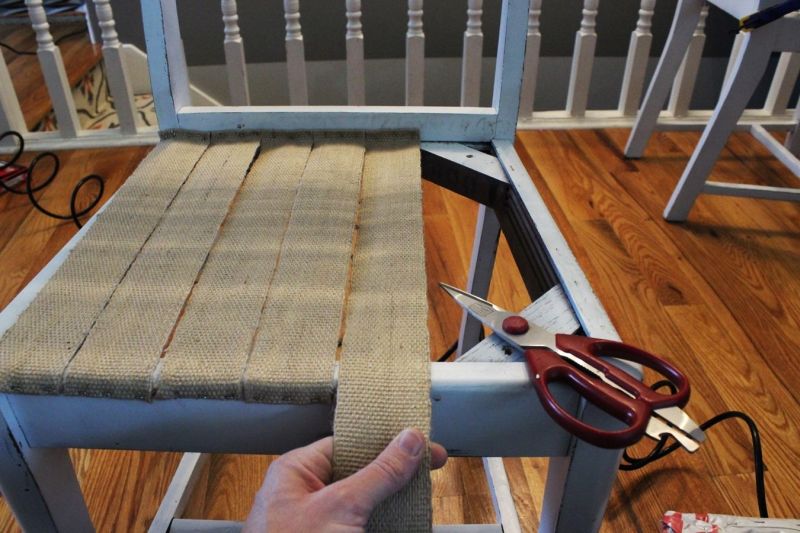
 Pull jute webbing taut (as tight as you tin is all-time) toward the front of the seat. Pull the webbing over the lip of the chair frame almost 1/two″, and so cut the webbing ane/ii″ longer than that to allow for folding the raw border under.
 View in gallery
 Staple the webbing in place on the front of the chair frame with three staples. Working outward, repeat this process with other webbing strips.
 View in gallery
 TIP: Be sure to cheque regularly to make sure your spacing will exist fifty-fifty across the entire seat. If your seat is angled at all, make allowances in your webbing alignment as yous go, such as using slightly more space near the front of the seat than the back.
 View in gallery
 TIP: Don't cutting all of your webbing at the kickoff; rather, measure and cutting each piece as you go. This will ensure that each slice fits perfectly and you don't come up short.
 View in gallery
 Go along to work outward from the first webbing strip, keeping the folded-under edges as even every bit possible.
 View in gallery
 Complete the parallel webbing strips on your chair seat. You may worry about their strength or ability to back up a person's actually sitting on the chair at this point. Don't worry besides much about this – if you've pulled each piece as tightly as you could, the weave of the perpendicular webbing strips will strengthen the entire chair seat.
 View in gallery
 Weave webbing over-nether-over-under (etc.) your already attached webbing strips. Take care non to pull the stapled webbing too far upward or downward as you lot practise this.
 View in gallery
 Fold under 1/2″ and staple iii times on one side.
 View in gallery
 Pull the woven webbing strip taut to extend about 1/2" over the chair frame, then cutting information technology off 1/2″ longer than that.
 View in gallery
 Fold this cutting edge nether, so place three staples to agree it securely.
 View in gallery
 Continue weaving and attaching jute webbing strips in this manner, alternating over-under weaves with under-over weaves. TIP: Every so often, button the middle woven sections toward the back of the chair to go along them straight across, as they have a tendency to curve otherwise.
 View in gallery
 Your stapled, webbed chair seat will look something like this when completed. If yous're subsequently the raw, industrial vibe, you lot could fifty-fifty leave the chair merely like this, with exposed staples and everything.
 View in gallery
 Of you could move on to the addition of nail head trim. Grab a bunch of blast heads and a safe mallet, and work your way carefully effectually the edge of the chair.
 View in gallery
 Try to keep the boom heads evenly spaced all the style effectually the chair, whether they're close together or spread out.
 View in gallery
 Vola! Then pretty.
 View in gallery
 I love the texture of the jute webbing on a elementary wooden chair.
 View in gallery
 And, woven together similar this, information technology's surprisingly strong. This volition be used as one of my dining chairs, so it'll get plenty of employ.
 View in gallery
 Another option, if y'all similar a little more emphasis on the woven aspect of the jute webbing, is to space out the webbing strips as you lot become. This provides a bit more of a rustic vibe to the chair.
 View in gallery
 Then simply conform your nail head trim on each webbing strip – for these 2" webbing strips, I found 4 nail heads to cover the area perfectly.
 View in gallery
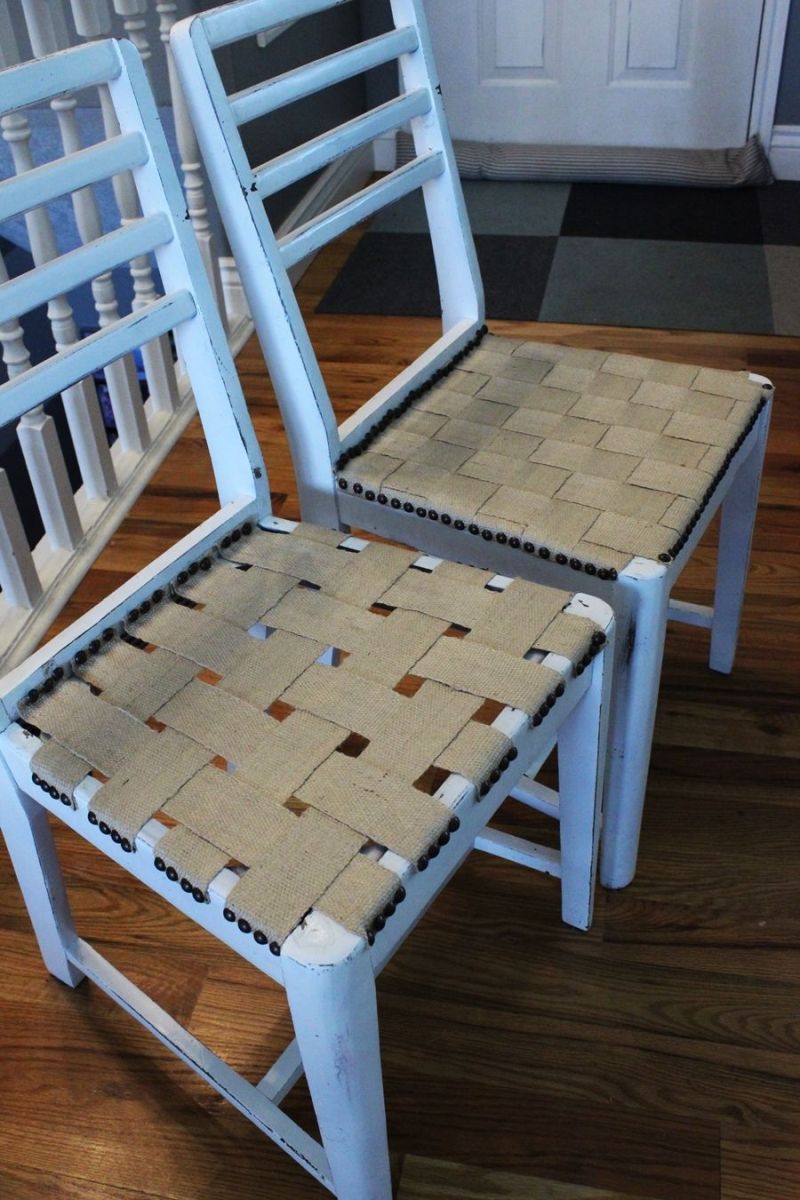
 Hither are the two completed chairs, next. I like their sameness-with-differences.
 View in gallery
 Which method or look do you lot prefer? They're both completely supportive and functional, although I experience like the tighter weave is slightly stronger. No surprise there, since in that location are ii more than strips to support the weight.
matthiesthandsoll.blogspot.com
Source: https://www.homedit.com/diy-jute-chair-seat/
0 Response to "DIY Jute Chair Seat: Give an Old Chair New Purpose"
Post a Comment